Thursday 26 December 2013

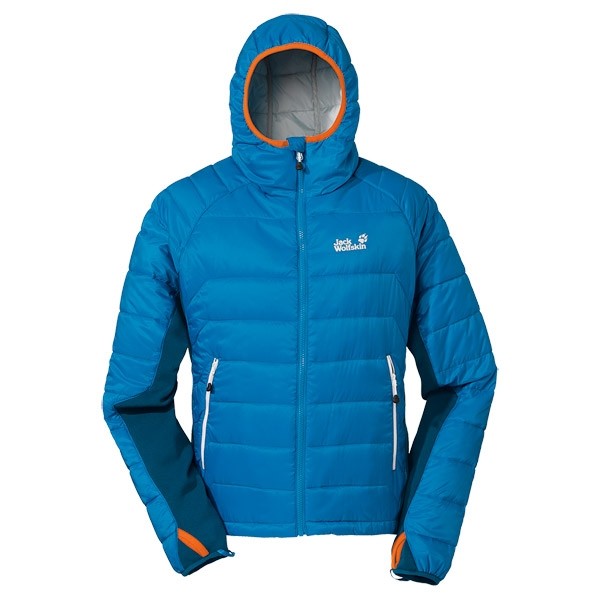
Jack Wolfskin Thermosphere Jacket Review


Jack Wolfskin is a company of which I have little experience using. Their kit does look quite good, although Im sure its not that hard to make things look good in a picture on the internet, but I have always been put off a bit by the name. Yes it is a bit silly but Jack Wolkskin just doesn't sound as appealing as Mountain Equipment or Mammut.
Testing in the Cairngorms
The Jack Wolfskin Thermosphere jacket is a semi insulated jacket with stretch panels under the arms hood. On first wearing the jacket I thought I had got the wrong size as it seemed really tight in the arms. I wasn't sure how much I was going to like this super tight feel but I have always think that having something very tight around my arms stops me from getting pumped. This tightness doesn't hinder movement, due to the stretchy panels.
Thermosphere jacket at the STS (under the shirt)
The jacket has a reasonably athletic fit to it, which combined with the tight sleeves, gives a non-bulky feel. This lack of bulk is useful if using the jacket for climbing in, or as a mid layer. I have used this jacket both whilst bouldering in cold conditions and as a mid layer underneath my waterproof whilst winter climbing. It has performed very well in both of these situations. The hood isn't really big enough to go over a helmet, although it will at a push, but does fit underneath quite nicely.
Climbing Magic Crack in the Thermosphere Jacket (blue hood)
There is not enough insulation to make this a belay jacket, but it is very good if used as part of a cold weather layering system.
I have been totally inseparable from this jacket since getting it. It performs well in the hills and is smart enough to wear around town (to the library mostly unfortunately!). If you are borderline in sizing then I would recommend sizing up though.
I absolutely love this jacket! I give it a maximum rating of 2 thumbs up.
The Thermosphere jacket is available from outdoorkit.co.uk with 10% off!

Tuesday 17 December 2013

Hot Aches Distilled Review

Distilled is the new film recently brought out by climbing film makers Hot Aches Productions.
Distilled is a climbing film following mountain guide (I'm not sure on exactly what qualifications he has) Andy Cave around Scotland in winter.
Distilled doesn't really fit the usual mold of climbing film. There is no hyping about how beautiful and natural a line is. In fact the climbing seems to be more of a means to keep the viewers eye busy while Andy tells the story of his life. That isn't to say that the film is badly shot. It really isn't. Its just that when I watched it I found Andy's story more interesting than what he was climbing, which is strange for me.
One thing that stands out from this film is the very unique life that Andy has lived. He has gone from a kid from a Yorkshire coal pit with no GCSE's to a world renowned climber summiting Himalayan Peaks with a PhD.
The film follows Andy Cave around Scotland in some very Scottish looking weather. I don't often think that I should wear waterproof trousers when winter climbing, especially not while watching films, but this certainly did. I must have watched this film at least 5 times now. I'm still yet to work out all of the routes that are featured in it (those labels are a bit subtle guys!). I have to say that seeing how little gear Andy carries on routes makes me feel a bit ashamed to climb things looking like a moving gear store!
The film does end on a bit of a somber note where Andy talks about his ascent of the North Face of Changabang, which claimed the life of his climbing partner Brendan Murphy. It was quite interesting for me to learn how Andy recovered from this and has since been back to the Himalayas.
I found Distilled inspiring in a very odd way. Its not like hot aches previous winter climbing film, The Pinncacle, which got me really psyched because of what Smith and Marshall did. I really can't put my finger on the way that Distilled has inspired me.
All I can really say is you have to watch it. Im sure its not to everyone's taste but give it a chance.
I give Distilled 1 thumb up.

Monday 9 December 2013

Magic Crack

On Saturday I met up with Pete Holder, who hitched all the way from Keswick to Aviermore (that's dedication). We headed into t'Schneada with a few idea about what we could try but no firm plans. Once in the corrie we decided to head for Magic Crack. This is a really iconic route, which was featured on the TV show the edge back in the day, or so I am told.
The route starts up The Genie before breaking out right up a steep foot less slab. Magic Crack can be done in two ways in winter. One by breaking out right after the crack pitch, for White Magic, or by following the summer line throughout, for Magic Crack.
I began by climbing the first pitch of The Genie, which felt really sketchy. I didn't manage to get much gear in but I got up it reasonably quickly. Pete led the second pitch, a really cool set of crack and a corner set just off vertical. Everything is there on this pitch but you do have to do some smearing in your crampons which is pretty good fun.
The third pitch was the money pitch. The finger crack is a pitch I had seen pictures of before and it looked really hard. I was a bit worried that there would be ice in the crack which would make protecting it really hard. The crack was full of the most helpful ice I have ever seen. It was good enough to allow me to hook it making the climbing easy, but not too good so that I had to struggle to clear it. I managed to climb this pitch quite steadily, until the very end of it where I spent a long time trying, and failing, to get some gear in.
The fourth pitch was Petes and he elected to climb the final hard pitch of Magic Crack, instead of copping out and climbing White Magic. He took a couple of falls on this pitch but persevered and managed to dispatch it. The climbing on this pitch was well protected but a bit blind with really poor feet!
The final couple of pitches were about grade II scrambles.
I really liked the climbing on this route. There was nothing too difficult but you were always thinking. I do quite like climbing things where you have to really try and place your feet as well.
I would recommend this route to anyone, especially if you get it in the conditions that we did! I have done a lot of route in the coire and I think I can say that this is by far the best one.

Tuesday 26 November 2013

Mountain Equipment Guide Glove Review

Mountain Equipment have a long history of producing very good mountaineering kit, and the Guide Glove is no exception. Mountain Equipment describe the guide glove as being a "work horse glove for all round mountaineering".  It features a waterproof lining, nylon outer shell, a nose wiping thumb cover and a fibre pile and fleece lining.
These were the first gloves I ever bought for winter climbing in back in my first year at uni and I'm now on my third pair. Needless to say I really like them! I have used other gloves too but in the end I always come back to the Guides.
Guide Gloves being put through their paces on Sioux Wall
The insulation on these gloves seems to be a nice compromise between warmth and finger dexterity. Yes you will have more movement in the fingers in thin gloves and you'll be warmer in more insulated gloves but you need to find a balance between using fingers and feeling them. The guides seem to have done this very well.
I also like the little nose wiping patch. This wont work for er... a big pay load, but it does suffice to wipe away the shrapnel.
One of my first attempts at tooling  in Guides back in second year, not sure why I needed to woolly hat 
They also come with elastic wrist leashes. These are very useful for not accidentally dropping gloves half way up a route! We've all seen this done on the Ben haven't we. Don't be that person! Keep them attached to you at all times.
Guide gloves on the summit of Bein Bhan a long time ago!
Another useful feature for a winter glove is a hard wearing outer. Winter climbing ruins gloves but the guides do seem to stand up to a fair amount of abuse. The nylon shell seems to work well for this.
Used on Cornucopia too!
One bad aspect of these gloves is their waterproofness, or rather lack of. They just don't seem to really stay dry. This however has been a problem with all gloves I have ever used. Maybe its because my hands sweat too much. Who knows.
Last but not least is price. These gloves are quite cheap by winter gloves standards. You can usually find them at about £45. Seeing as you will go through gloves so fast I think it is a good idea to get relatively cheap ones. I have never found a pair of gloves which are as good as guides and this cheap!
I give Mountain Equipment Guide Gloves a rating of 1 thumb up, but it is oh so nearly 2! A top notch all round gloves!
Sorry about the pictures but its hard to get pictures of gloves. I am wearing the gloves in all of them, honest.
You can buy ME Guide Gloves from Outdoorkit.co.uk with 11% off!

Friday 22 November 2013

Ben Nevis Winter Conditions 21.11.13

I made my way to the Ben with Dan Tait yesterday. The plan was to climb Cornucopia, but I suspected this would change as I got more scared on the walk in.
The first sight of the North Face showed some nice white looking upper cliffs, but the lower buttresses were still black.
The view from the hut was even better!
The Douglas boulder didn't look in. No easy short walk in options at the moment.

We walked up further into the corrie with cliffs getting whiter as we went higher. I managed to remain psyched for Cornucopia so I aimed for that. Sioux wall looked in a good lean condition, and The Secret looked in about the same condition of the cool picture of Andy doing the first ascent.
The weather was really nice all the way up being still and clear. This was until we reached No.3 Gully where the wind seemed to be funneled up it. I managed to flake the ropes up hill!
Pitch 1 of is supposed to be a steep snow pitch, but it was far from this. I had to mantle onto a stein pull, not a usual snow climbing technique. 

Pitch 2 is the crux pitch with what I have heard is supposed to be a bit of a perplexing crux. Despite getting hot aches just below the crux moves it didn't go down to badly. There are loads of small features for the feet and a nice fat crack for good gear and torquing. Despite a bit of glove faff Dan did well seconding this pitch, although he did fall off at the crux. Im quite impressed seeing as the previously hardest mixed he has climbed is Moonshadow (IV) in SCNL with me last year. 

The 3rd pitch was a cool little chimney. After the first few meters it felt quite secure so I just ran it out a bit to save time. We had taken a long time climbing this route so in the end we were both using head torches. 
Mixed things look good at the moment, especially high up. Winter is definitely here!

Tuesday 19 November 2013

SCNL Winter Conditions 19.11.13

Today I went to Stob Coire nan Lochan with Dan Tait and Helen Rennard with the intention of making the second ascent of Twisted (VII,7). The forecast looked good (really cold, not too windy) so waking up at 3am for the drive over wasn't too much hassle.
Stobe Coire


We met Helen in the car park and set off up. Things looked good, the snow line was low and it was feeling cold! It wasn't until it started getting light and I could start seeing the corrie that I was getting worried but I assured myself things would start looking whiter when we got closer. They didn't.
Twisted and Chimney Route

Unicorn and Scansor
We looked at twisted but it had a big black section at the bottom. Chimney route was a bit whiter but it was dripping. We walked along the crag but everything looked to have large no wintry looking sections. In the end we started up Crest Route, which is quite high up so we thought it was a good bet. I climbed pitch 1, which featured lots of bad truf! The start of pitch 2 however was completely black so we backed off and went for a walk to the top.
Crest Route Pitch 2
We had a look over at Bidean and the Lost Valley but nothing looked particularly white.
Bidean
Lost Valley
In summary things aren't very in at the moment. Also it wasn't minus 5 degrees like MWIS had said it would be! Hopefully if the cold weather continues and things start getting blown around a bit some mixed lines may be in by the end of the week.
Also a tip. Don't walk around with your axes over your shoulder and your thumbs over the pommels. When you fall over it jars your thumbs. Mine hurt!

Monday 18 November 2013

Drytooling Pilgrimage

This weekend I went on a bit of southern drytooling pligrimage visiting crags in both England and Wales.
On Friday morning I left Edinburgh for the Lake District venue of The Works with the idea of trying Greg Boswells new route Power Dab. I was to meet up with Andy Turner and Pete Holder there.
Power Dab gets D13, the hardest grade given to a dyrtooling route in Britian. It shares this grade with a route at Newtyle. I wasn't sure what to expect of the route. It looks super powerful with big moves, not usually the thing Im good at.
On only my second attempt on the route I managed to get all the moves done in 3 sections. I find the crux to be pulling onto the head wall after the roof. Andy managed to climb the route on his second attempt of the day bagging the second ascent!
That evening I made my way further south to the welsh tooling venue, White Goods, near Ruthin. The weekend was the annual White Goods Tooling meet organised by Dave Garry.
On Saturday I met up with others from Scotland; Steve Johnston, Neil Silver, Simon Yearsley and many others. I managed to flash White Goods (D8+), Jaz (D8) and Doorstep Challenge (D8+). I had a go at a new link up, which still hadn't been climbed at the time. It took a traverse line starting up Tumble in the Jungle and finishing up Ready Steady Hook. I had a good go but I took a big fall whilst clipping moving through The Finnish Start.
On Sunday I went back to The Works, this time with Pete Hill, to have a go on Power Dab again. I managed to decent link on it but I didn't have enough guns to finish it off. In the end I climbed Outfield (D7) and Lakes Ethics (D9+).
Hopefully there will be some pictures to follow!

Monday 11 November 2013

Coire an Lochain Winter Conditions 10.11.13

On Sunday I made my second winter trip of the season to the classic early season venue of Coire and Lochain in the Northern Corries of Cairngorm.
Looking across to Savage slit and Fallout
The day started out a bit cold, windy and cloudy but I did see a few friends in the car park heading to t'Schneada. Today I was climbing with two friends from across the border, Pete Holder and Jack Loftus. Despite doing a lot of drytooling with Pete I had never winter climbed with him.
We had some wild ideas of trying something on the Happy Tyroleans wall (ok maybe that was me) and then Daddy Longlegs (me again). In the end we went for Ventricle (VII 8). Both Pete and I tried to lead the first pitch but got stopped by an awkward slopping ledge, just above a nice friendly ledge. It wouldn't have been so friendly if one of us had fallen on it. I also fell after trying the move a lot of times but one of the axes luckily stuck while all other points of contact came off. It shouldn't be this hard!
In the end we climbed The Aurcile (VI 7). The main overhanging corner crack pitch is definitely the crux, but it isn't all over on the last pitch either.
Auricle Pitch 1
Auricle Crux Pitch
Final Pitch
Conditions were good in the corrie with a healthy coating of rime covering all surface, except Fallout Corner (although it was probably still "in"). I found some bits of ok turf kicking about, although its far from perfect. Things appear to be in good early season condition at the moment.
We couldn't see any other teams climbing in the corrie, but I think the was a team on Hoarmaster. There was a big bit of rime missing on the buttress between the branches of Y-Gully, so maybe something was climbed up there too.
Lochain with its winter coat


Sunday 3 November 2013

CAC Festival of Ice

The final
Yesterday was the first dry tooling competition of the season. It was a charity event at the Ice Factor in Kinlochleven, organised in support of Climbers Against Cancer (CAC).
Qualification in the ice wall
It was a good competition, helped by the addition of some famous names to the start list. Olympic Ice Climber Andy Turner and the man-machine Greg Boswell both turned up to compete.
Kev  Shields and the rest of the team at the Ice Factor did a really good job of organizing a very good competition with people of all abilities having a really good day.
Checking out the final route
I only dropped points on one route getting 147/150. This put me in joint first with Greg Boswell, Andy Inglis and Ewan Rodgers. Also getting 147 was Andy Turner but he was competing in the veterans category. I managed to finish all the routes really early and handed my score sheet in first, which technically made me qualify in first.
My first place qualification meant that I was last out of isolation for the finals route up the main wall, which was set to its steepest angle. I had a lot of time to sit in isolation and get nervous. I was feeling pretty bad until I sat down and decided to just see this as training. A bit of nervy competition experience will be good for my future climbing.
The finals route wasn't too hard so I was a bit annoyed to fall off it, especially seeing as everyone else topped it out. This put me in fifth, with Greg winning, Stevie in second and Ewan in third. Andy managed to cruise to victory in the veterans and Fiona Murray won the womens competition.
I had a really good day and despite feeling that I could have done better I do now have something to work on for the next competition!
I have attached some pictures of me from the final taken by Gabi Tomescu, Dom Scott and GnBri Photography.

I thought I'd look silly popping off the first hold hence the concentration face.
Some big moves
Who needs feet?
Oh right yeah, me.

Tuesday 17 September 2013

Skin Thicke

The skin on your fingers is what keeps you attached whilst rock climbing. The muscles and ligaments in your arms, and the rubber on your shoes, do a lot of work too, but without the skin on your finger tips then you would never be able to make and reasonable upwards progress. With this in mind it is very important that you keep it in good condition if you want to climb regularly.
This summer I have been extremely active on rock and I have had to develop a bit of a skin regime as a result. In general this isn't my sort of thing. I know some "modern men" have a beautifying regime, which probably includes things like brushing their hair, but you don't need to go that far to secure the longevity of your skin.
"Modern Man" (IRD Collection)
I also used to think that I climbed a lot but my skin was never really very bad so it wasn't really necessary to look after it that much. This summer has shown me a different side. To cut a long story, which I have told in other blog posts (hint), short I climbed a lot and lost a lot of skin. It was so bad that I was forced to take rest days, which is very much unlike me.
This lack of skin led me to test 3 types of climbing orientated moisturizer. These were the classic ClimbOn, Tip Juice and ProBalm. They all seemed to work in largely the same way. If I was going to go out and buy them again though I think I would go for ClimbOn, closely followed by Tip Juice. I liked the bar style of ClimbOn more than the tub based Tip Juice, but it did work well.
My climbing related skin management guidelines are what works for me. Every individual is different so tailor this to work for yourself.
Wash Your Hands: After climbing wash all the chalk off your hands. Whilst climbing however try not to wash them or get them too wet. Granted this isn't always possible and if you have to then make sure they are completely dry, maybe bring a towel or something. If I get my skin wet in the middle of a session it often feels quite sore to pull on holds.
Moisturize: Use some sort of moisturizer after climbing. This will help skin regenerate and hopefully stop it from hurting the next day. Make sure to wash your hands first. I find ClimbOn to be very good but as long as it moisturizes I don't think it matters too much.
Rock Types: Different rock types affect your skin in different ways. It is all to do with the grains within them. The small rounded grains found in Northumberland sandstone work like sand paper removing skin from your tips. This hurts a lot after a while. The large sharp crystals found in rocks like Gneiss don't abrade like sandstone but I find that they nick the skin more easily forming flappers. Climbing on sandstone will benefit more from the use of the procedure outlined above more than Gneiss, and others like it.
A flapper, not so Gneiss
I hope this helps anyone who has come up against this sort of climbing related hurdle. There is loads of other information about it. Dave Macleod has a good section on this in his book "9 out of 10 Climbers". 

Friday 13 September 2013

Petzl Adjama Harness Review

I acquired a Petzl Adjama harness a while ago to test. I have since clocked up a good number of hours in the harness in a trip to the alps and a my usual central belt cragging and here are my thoughts on it.
Comfort: The Adjama is made with what Petzl call an "EndoFrame Constuction". The prefix Endo, in the instance, means to absorb. I'm not sure exactly what it absorbs, but it does sound cool. The designs gives an extra wide waist belt around the sides and doubled straps on both the leg and waist loops. After studying the harness I can't really work out what the doubled straps are, but rest assured they are there. This design seems to have worked as the harness is very comfortable to hang in for extended periods of time. I usually get very uncomfortable pressure points on my hips, but the Adjama seems to have eliminated this. The Adjama is also fine to walk in, as I found out after a long walk around the Vallee Blanche and Mer de Glace.
Gearing up at Refuge de Sele
Gear Loops: The Adjama features 4 fabric gear loops. There are two different types of gear loop on the harness. The front two are rigid and have a slightly asymmetrical shape, with the rear two being flexible and symmetrical. The shape of the front gear loops is important as I find I put most of my important gear on them. The front gear loops slope slightly towards the front of the harness so that when you remove a piece of gear then the rest of the gear slides forward. The rear ones are flexible to prevent pressure points when wearing a back pack. The gear loops seem plenty big enough even for a big alpine rock route rack. There are 2 caritool attachment points and a haul loop at the back of the harness too.
Adjama in the Alps
Adjustment: There is one buckle on each of the major weight bearing straps on the harness; the waist loop and 2 legs loops. These allow maximum adjustment for a minimum weight. The buckles are pre-double backed saving time and the possibly the dangerous scenario of forgetting to double them back yourself. The buckles are all easy to use, even with gloves on. The straps tuck neatly away once tightened. The leg loops expand enough to allow you to put it on over crampons and big boots, although maybe for speeds sake put it on before your crampons.
Looks: It comes in a sort of purple-grey colour. It looks a bit dull but it won't clash with whatever garish shirt/trousers combo you may be sporting. It also wont show up in photo's very well, as you may be able to tell from the pictures.
Weight: Mine is a M-L which weighs in at 420g. The small is lighter and large is heavier. Its not really a featherweight but its hardly extra bulky either.
Conclusions: I honestly can't fault this harness. Petzl are good at what they do and have made a very good, well thought out harness. Its comfy, not too heavy and has nice features. You won't be disappointed with this harness. It gets a healthy 2 thumbs up from me.
The Petzl Adjama harness is available from outdoorkit.co.uk with 10% off.